Writing Technical Documentation So Easy, a Caveman Can Do It
An article that explains how to write technical documentation—in the style of technical documentation.
This article, written in the documentation style that it describes, is intended for people who will be writing technical documents or how-to guides for tools, programs, products, processes, etc.
Table of Contents
I. Summary
II. Before You Begin Writing
III. Organizing Your Document
IV. Writing Good Instructions
V. Important Miscellaneous Info
VI. Post-Publishing
Note: Each item in the table of contents should link to its corresponding section below in an actual technical document. Due to Hashnode's linking limitations, I have not done that here.
I. Summary
Writing technical documentation can be time-consuming and requires some research and planning ahead of time, but it doesn't have to be hard! This article is a living example of how you can lay out and organize your documentation for easy readability.
I'm no technical writing expert, but I do write documentation quite often for my job, and have been told that my documentation is easy to understand, easy to navigate, and well-organized. While my style may not work for everyone and everything, I thought I'd share my approach.
II. Before You Begin Writing
A. Understand your topic
It may go without saying, but you need to deeply understand the topic for which you are writing documentation. You should have used the software, process, etc enough to explain how it works clearly to someone with little to no knowledge of it.
While you're writing, it's a good idea to follow your own steps to make sure that you are not leaving out anything you may have forgotten. For example, if you're telling us that a certain container on a web page lives in a tree structure that follows the path Site → Home → Projects → Products, double-check that path yourself to make sure you didn't forget a folder somewhere in the middle.
It may very well be that the act of writing the documentation is your plan to understand it, which is fine. Just expect the process to take longer, as you are researching, trying things out for yourself, and writing about it all at the same time!
B. Ask your peers
Even if you feel that you know a topic very well, be sure to consult your peers who are also familiar with the topic to see if they have any tips or suggestions that you can include in your documentation. You may be well-versed on the main ideas, but a team member might remember some of the minor quirks about the product that a new user should be aware of, such as "that weird thing where you have to click the publish button twice if you're using Firefox."
C. Choose your medium
If you are writing documentation in a work setting, your team may already use a specific tool for documentation, such as Google Docs, GitHub or Atlassian's Confluence wiki.
I could write entirely separate documentation about how to use each of these tools to write documentation, but for the purposes of this article, I will assume you can use a basic Google Doc. Whatever you use, make sure your document is easy for future readers to access and edit.
D. Outline your document
Before you begin writing your actual document, list the main topics and subtopics you want to include. This could be as simple as jotting them down on a piece of paper or Notepad file. If you think of any little tidbits you don't want to forget, jot those down, too. You can fit them into their relevant sections later.
Once you've got all your ideas out of your head, arrange them in a logical order that flows from start to finish. It'll be much easier to write your document when you have a plan in place.
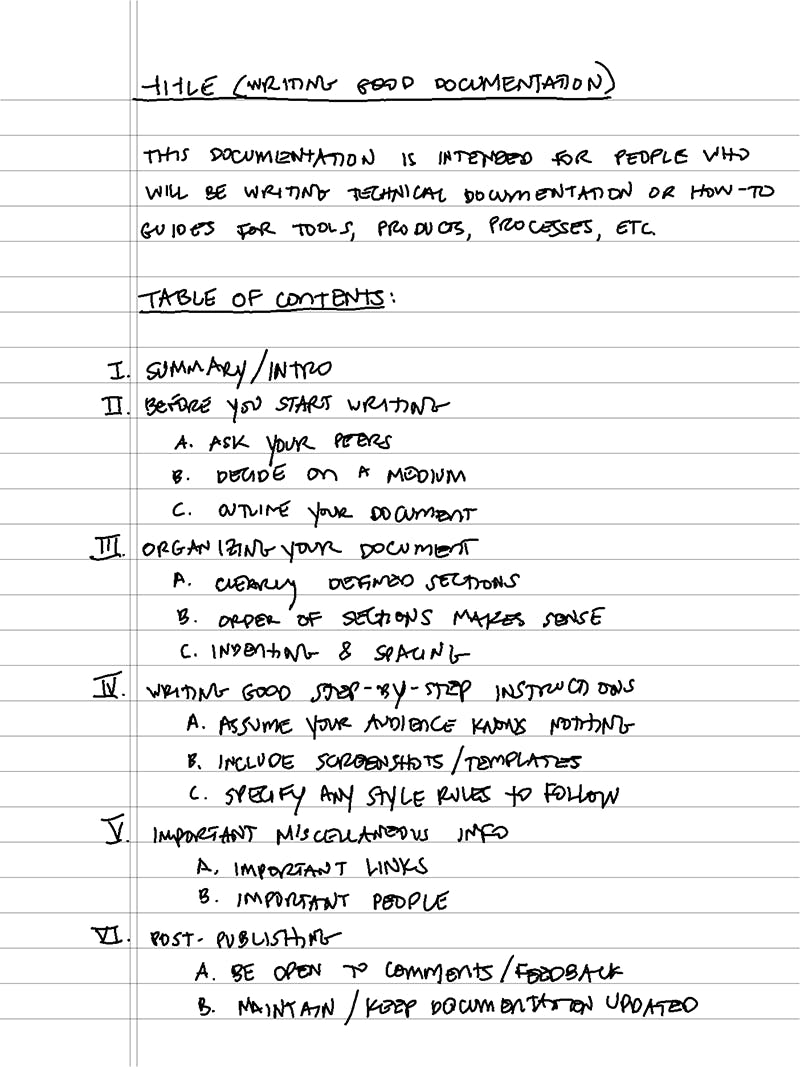
Here is an example of how the outline for this very documentation looked before I began writing. It has changed a bit between this outline and the final product, but the bones are there:
III. Organizing Your Document
A. Get started
Open a new Google Doc, adjust your margins, layout, font, etc to your preferred settings, and begin writing a few introductory pieces:
Start with a title that clearly states what your documentation will cover at the top of the page.
Underneath the title, include a short snippet explaining who would benefit from this documentation. Is it for project managers who will be using a certain template to create reports? Is it for web content managers who will be updating pages in a proprietary CMS? For this article, my example snippet above reads:
"This article, written in the documentation style that it describes, is intended for people who will be writing technical documents or how-to guides for tools, programs, products, processes, etc."
Finally, be sure to include a Table of Contents. This article lists only the main sections in the Table of Contents above to save space, but in a real technical document, you would also include the subsections (the sections with lettered headings) nested underneath each of the main sections. You'll add anchor links to all of the section and subsection headings when you're finished writing.
After you've written those three items, you can move on to the meat of your documentation.
B. Define clear sections
Each major section should contain subsections that directly relate to the main section's heading. In this example, you will find the subsection called "Outline your document" under the main section called "Before You Begin Writing" rather than, say, the main section called "Post-Publishing", obviously. Your sections should make sense.
Go ahead and type out all of your section and subsection headings. You can adjust them later on if needed.
C. Order your sections
Your documentation should flow in some kind of chronological order from the first thing the user should do to the last, or from the most basic instruction to the most complicated. If you're teaching someone how to open a JIRA ticket, you wouldn't start with, "Assign the JIRA ticket to the necessary team." You would probably start with something like "Click 'Create' at the top of the page to start a new JIRA ticket."
Read through each of the sections and subsections you typed and make sure they follow a logical order.
D. Indent, number and space out your sections
Indent each of your subsections, and then if you have any sections within those, indent them even more. Make it easy for your reader to interpret which subsections belong to which main topics.
Pick a numbering system and stick to it. I tend to use roman numerals for main headings, then ABC lettering for subsections, then 123 numbering if there are any step-by-step instructions or smaller sections within those subsections. You can use whatever you'd like, as long as you stay consistent.
As you begin writing your content, add space between paragraphs and sections. Each paragraph should discuss one idea. Once a paragraph starts to get longer than 3-5 sentences, find a way to break it into two. It's much easier for the reader to scan through shorter paragraphs.
IV. Writing Good Instructions
A. Assume your audience knows nothing
Ok, maybe not nothing... you can probably assume they know how to find their way around a computer. But write your instructions as if the readers have never in their lives seen the thing you are discussing, whether it's a software, tool or process. As the Reddit group says, try to "Explain like I'm 5." Don't overcomplicate things or use flowery language. These should be basic how-to instructions.
B. Include screenshots
It is almost always easier for the reader to quickly interpret visual guides than to read through long blocks of texts. Wherever possible, include screenshots of the process you're documenting. Bonus points if you include text along with the screenshot to clearly identify the areas you're describing.
For example, let's say you're teaching your reader how to fill out a JIRA ticket for a specific team. You might include a screenshot of the JIRA form along with explanations about what to put in each field:
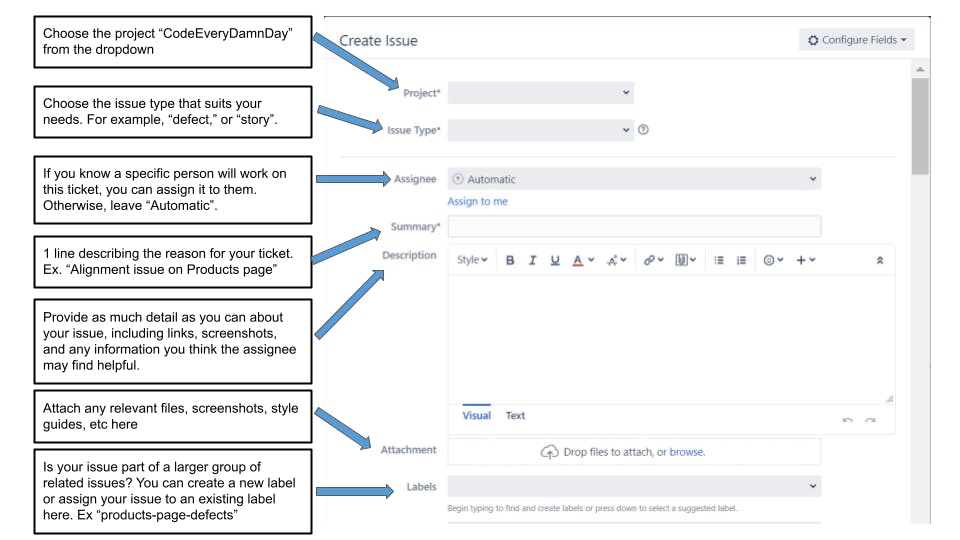
Don't forget to take accessibility into consideration. If you post a screenshot, you should include alt text that clearly describes the screenshot. To add alt text to an image in a Google Doc, simply right-click the image and choose "Alt text".
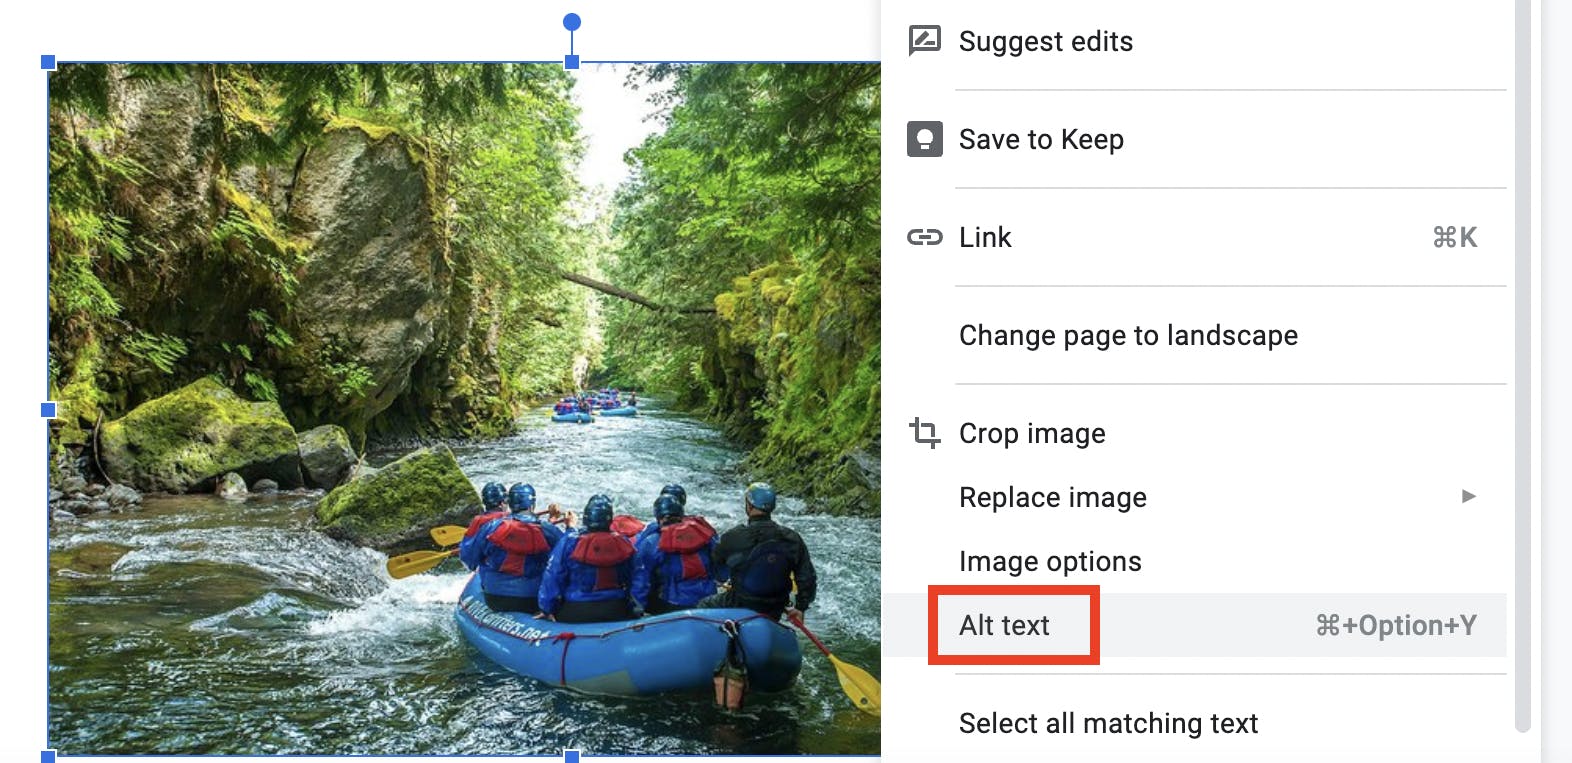
You will then see a dialog box that allows you to enter your text. If there is text as part of your image, you should type all of that text into your alt text as well.
Ideally, you should try to include any text descriptions as part of the document itself, rather them embedding descriptions into images.
V. Important Miscellaneous Info
A. List important links
You will probably have some external links related to your documentation that would be helpful to share. Don't forget to include links to other pages of documentation that go more in-depth about a topic you're discussing, example templates, any relevant tools or websites you mention, team dashboards, etc.
B. List important people
Include a table of teams or people that the reader may need to reach out to or work closely with, if applicable. Due to Hashnode's limitations with creating tables, I've created a crude version here:
Name: Team: Slack Handle:
Harry Potter UI/UX Design @ chosenone
Ron Weasley Frontend Dev @ anotherweasley
Hermione Granger Marketing @ hgranger
For the purposes of this documentation, I've made the table of important people quite small. You can also add email addresses and more detailed explanations of how each person can help. "Reach out to Hermione for questions about copy and media", for example.
VI. Post-Publishing
A. Review and add Table of Contents links
Once you're finished writing, reread your documentation and check for spelling errors, numbering errors, easy readability, etc.
Don't forget to add anchor links from each section in the Table of Contents down to their relevant areas! Here's how you do this in Google Docs:
1. Go to the section header you want to link to and highlight the text.

2. Click "Insert", then "Bookmark".
3. You will see a little flag and the word "Bookmark" appear under your text.
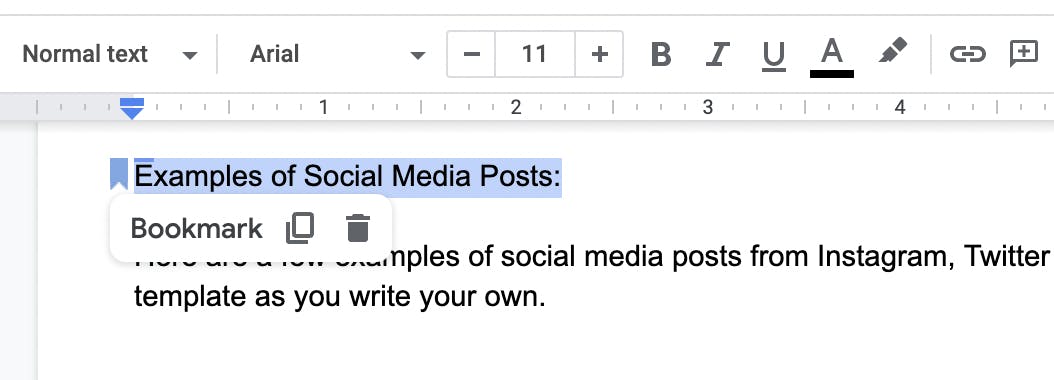
4. Scroll up to your Table of Contents and highlight the text that you want to link down to the section you just bookmarked.
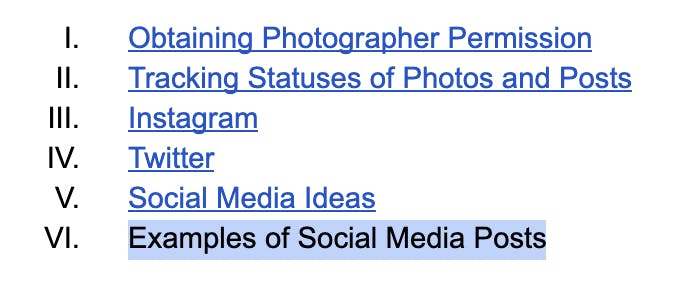
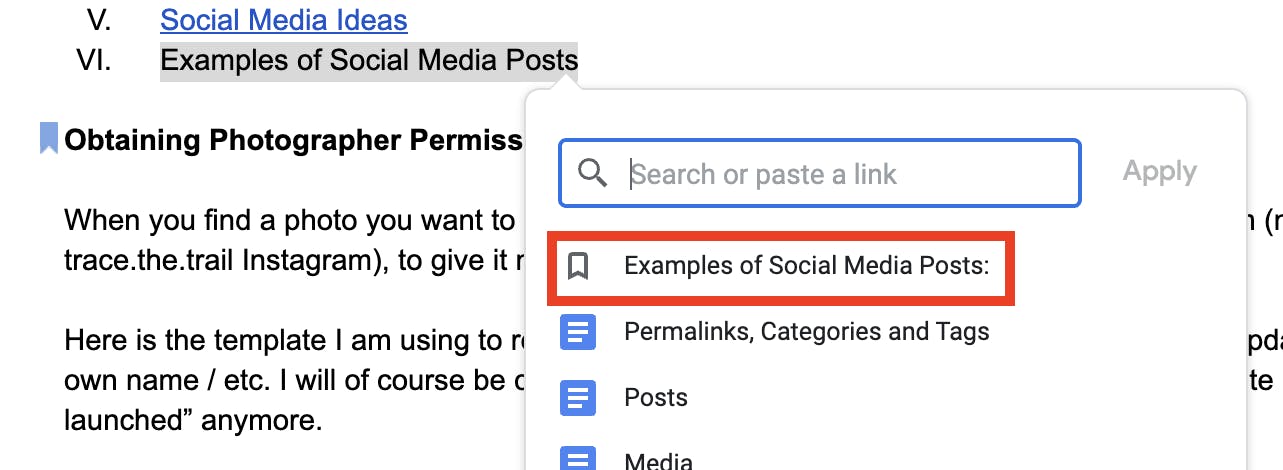
5. Click "Insert", then "Link".
6. You should see a list of sections you have bookmarked but not linked to yet. Choose the appropriate bookmark.
7. Test your link. Click on the link you just created, and then click on the word "Bookmark" that pops up. This should take you down to the link's corresponding section.
8. Repeat for all other headings.
B. Be open to comments and feedback
Once you have published your documentation, share with your peers—both those who already know how to do what you have documented, and those who do not. Ask for feedback. Your "in-the-know" peers may notice something you've left out, or something you need to update. Your peers who are new to the topic you are writing about can let you know if any sections are unclear.
C. Keep your documentation up to date
How many times have you tried to Google how to do something, such as change an annoying setting on your phone, only to find that all the articles on the topic are from five years ago and the instructions no longer work on newer phones?
Keeping your documentation up to date is perhaps the hardest part of writing documentation, because it's easy to publish your final document and forget about it. However, things change rapidly, especially in the technology field. Check your documentation often. Have any of the people in your "Important People" list left the company? Has the web address to one of the other wiki pages you link to changed?
If you maintain many documents, it may be a good idea to set a reminder on your calendar every month to skim through them and ensure that nothing is out-of-date.
If you're writing documentation mostly in a work setting, be sure that at least a couple of other people are familiar with your documents and have edit access in order to keep the documentation updated if you happen to leave the company.
Good documentation keeps things running smoothly. Whether you're a technical writer or not—creating clean, detailed, easy-to-follow documentation isn't hard as long as you do your research, outline your document ahead of time and organize your sections effectively. Your present and future peers will thank you!
